The Beginner Knots for Lure Fishing You Need First
- Category
- Fishing Knots
- Date
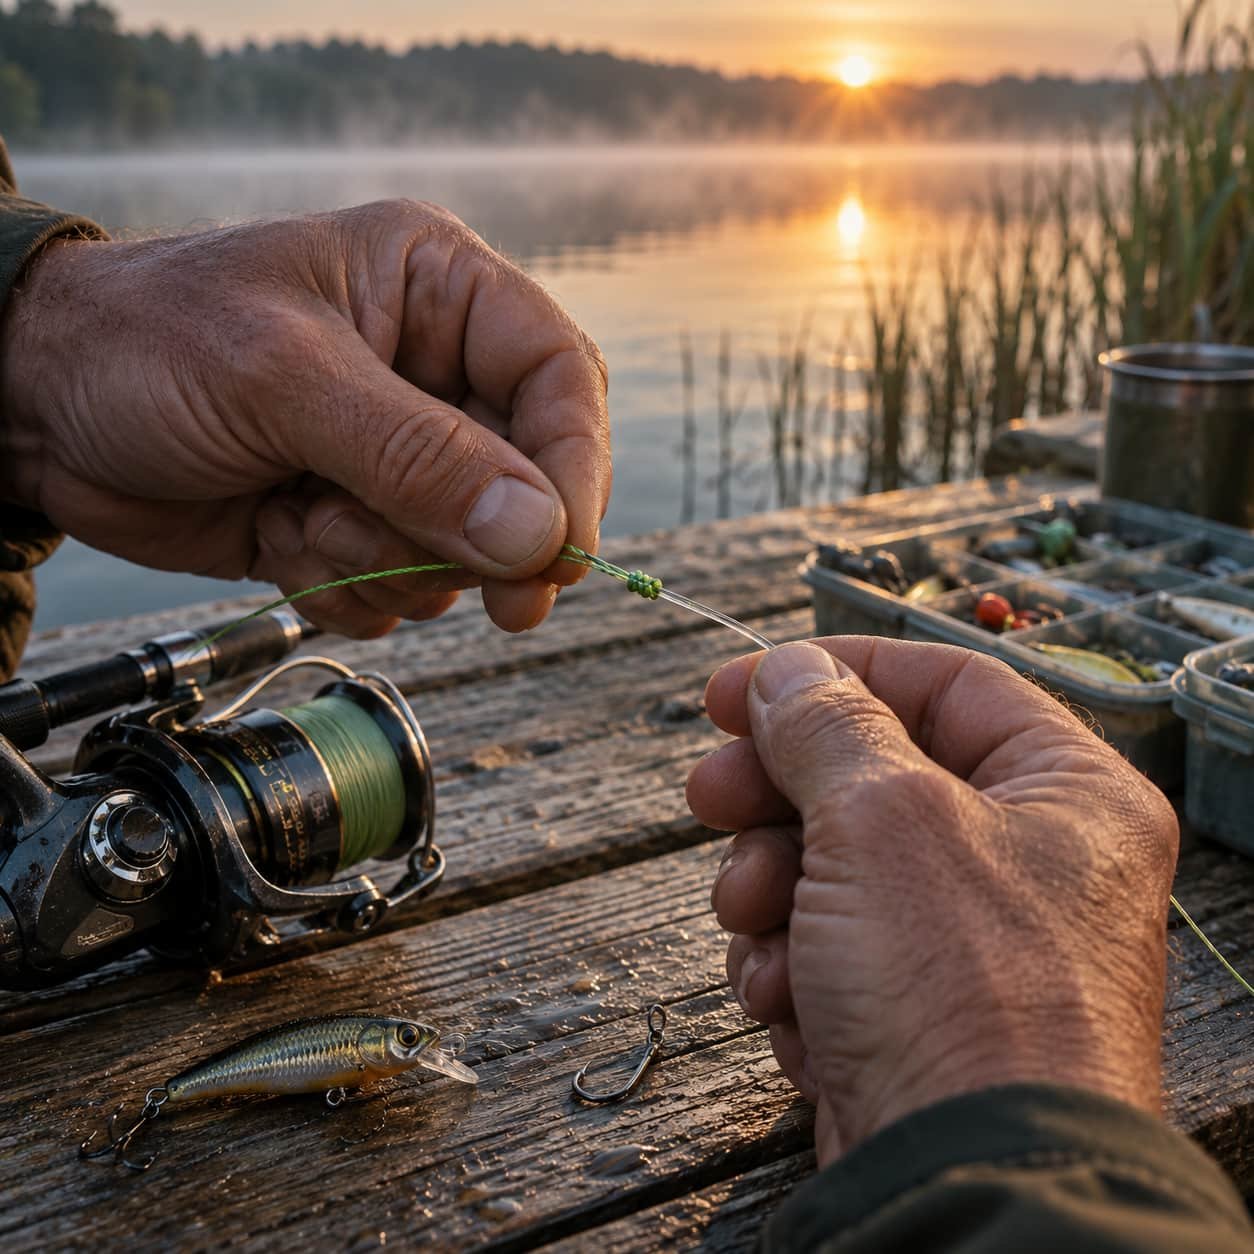
Most lost lures are not really about bad luck. More often, the problem starts with a knot that was tied too quickly, seated poorly, or never tested before the cast.
This beginner guide covers the knots that matter most for your reel, leader, hooks, and hard baits, including the FG, Palomar, and Uni knots. You do not need to memorize dozens of them. Learn a few reliable knots, tie them cleanly, and give each one a firm pull before you fish.
A good knot is a small detail, but it can save your lure, protect your line, and give you more confidence when the water finally looks right.
How do you attach fishing line to the reel spool?
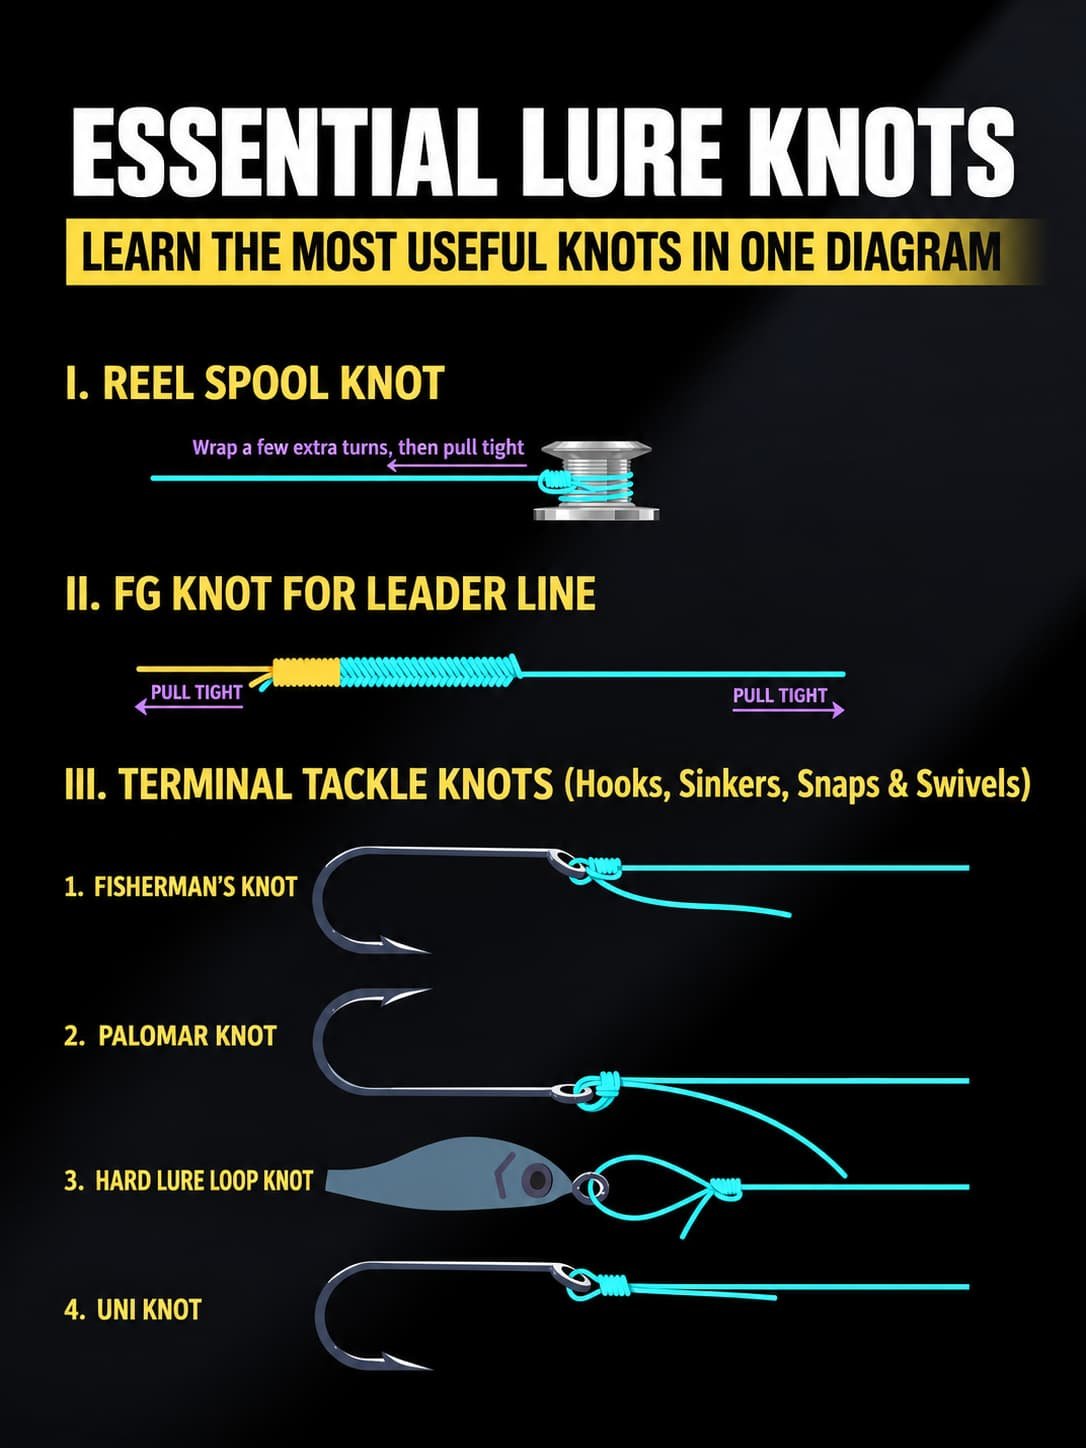
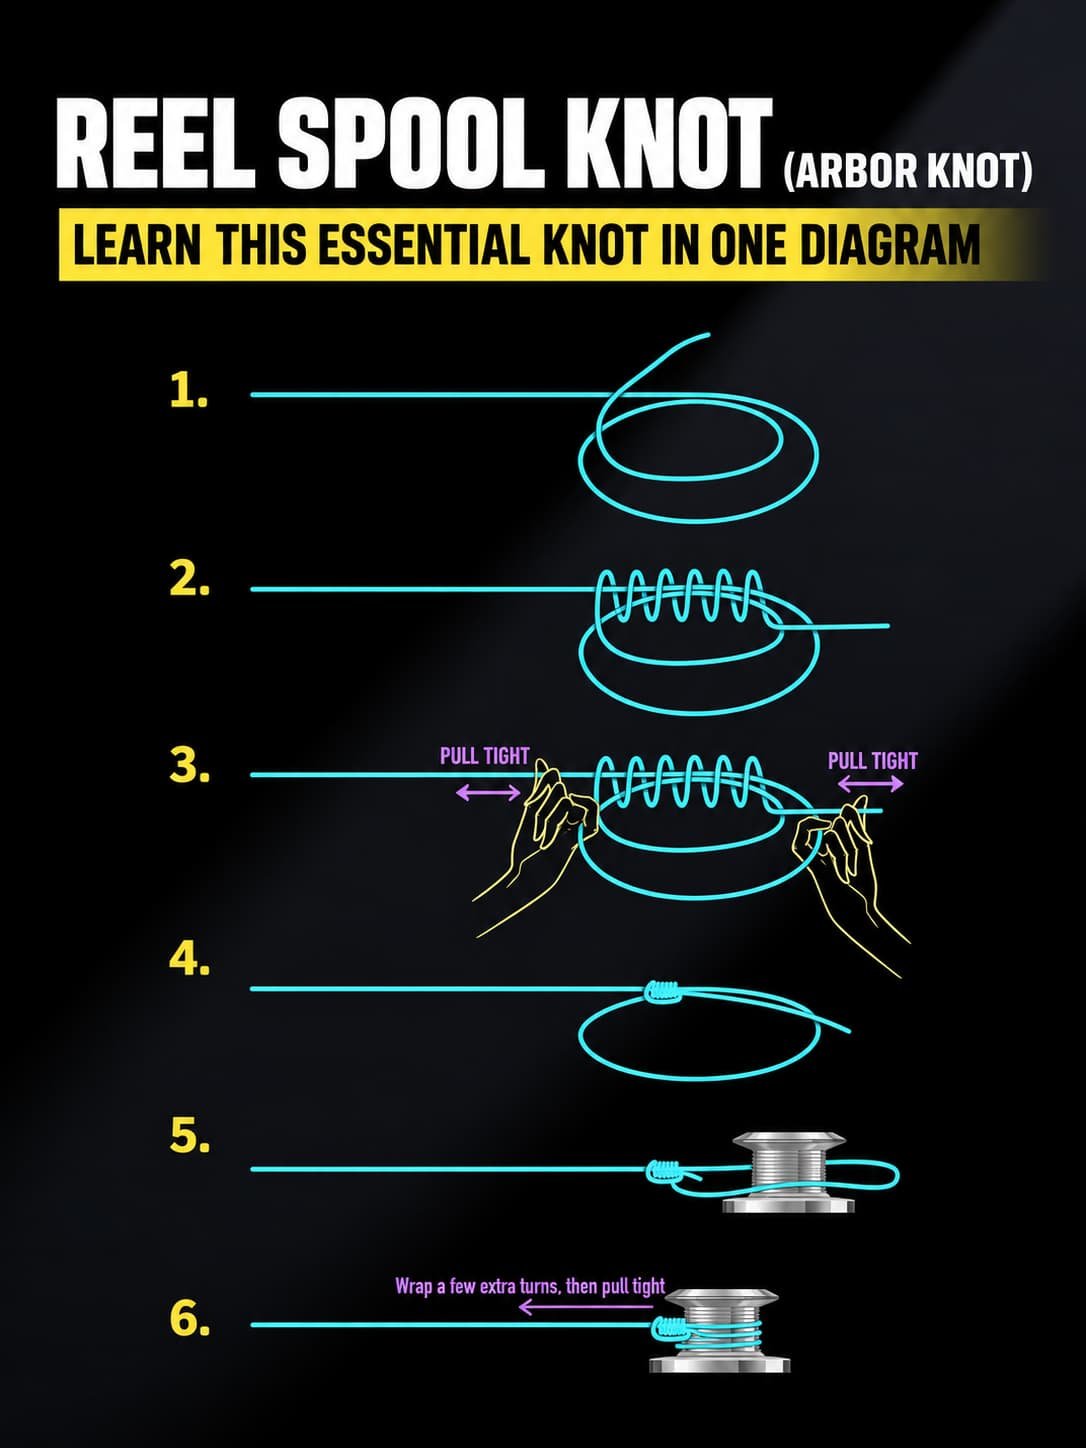
A sliding Uni-style loop can attach fishing line around the reel spool. Form the loop, wrap the tag end around the doubled line inside the loop, and tighten the wraps before sliding the connection against the spool. The reel-spool illustration shows this method, although the heading calls the connection an Arbor knot.
The spool’s arbor is the central barrel that holds the line. A conventional Arbor knot uses two overhand knots; the illustrated sliding knot uses a different construction. Keeping those names separate helps you follow the correct tying sequence when you compare instructions.
- Form a large loop with enough room to fit around the spool arbor.
- Bring the tag end back alongside the standing line and form a smaller working loop.
- Make several wraps around both parallel strands, passing the tag end through the working loop with each turn.
- Pull the tag end to gather the wraps into a compact knot. Keep the large loop open.
- Place the large loop around the spool arbor.
- Take a few extra turns around the arbor, as illustrated, then pull the standing line to snug the connection down. Arrange the turns so winding the reel tightens them.
Check the attachment before winding line onto the reel. The knot should tighten around the arbor when you pull the standing line. A loose loop needs attention before the remaining line covers the connection.
What should beginners know about the FG knot?
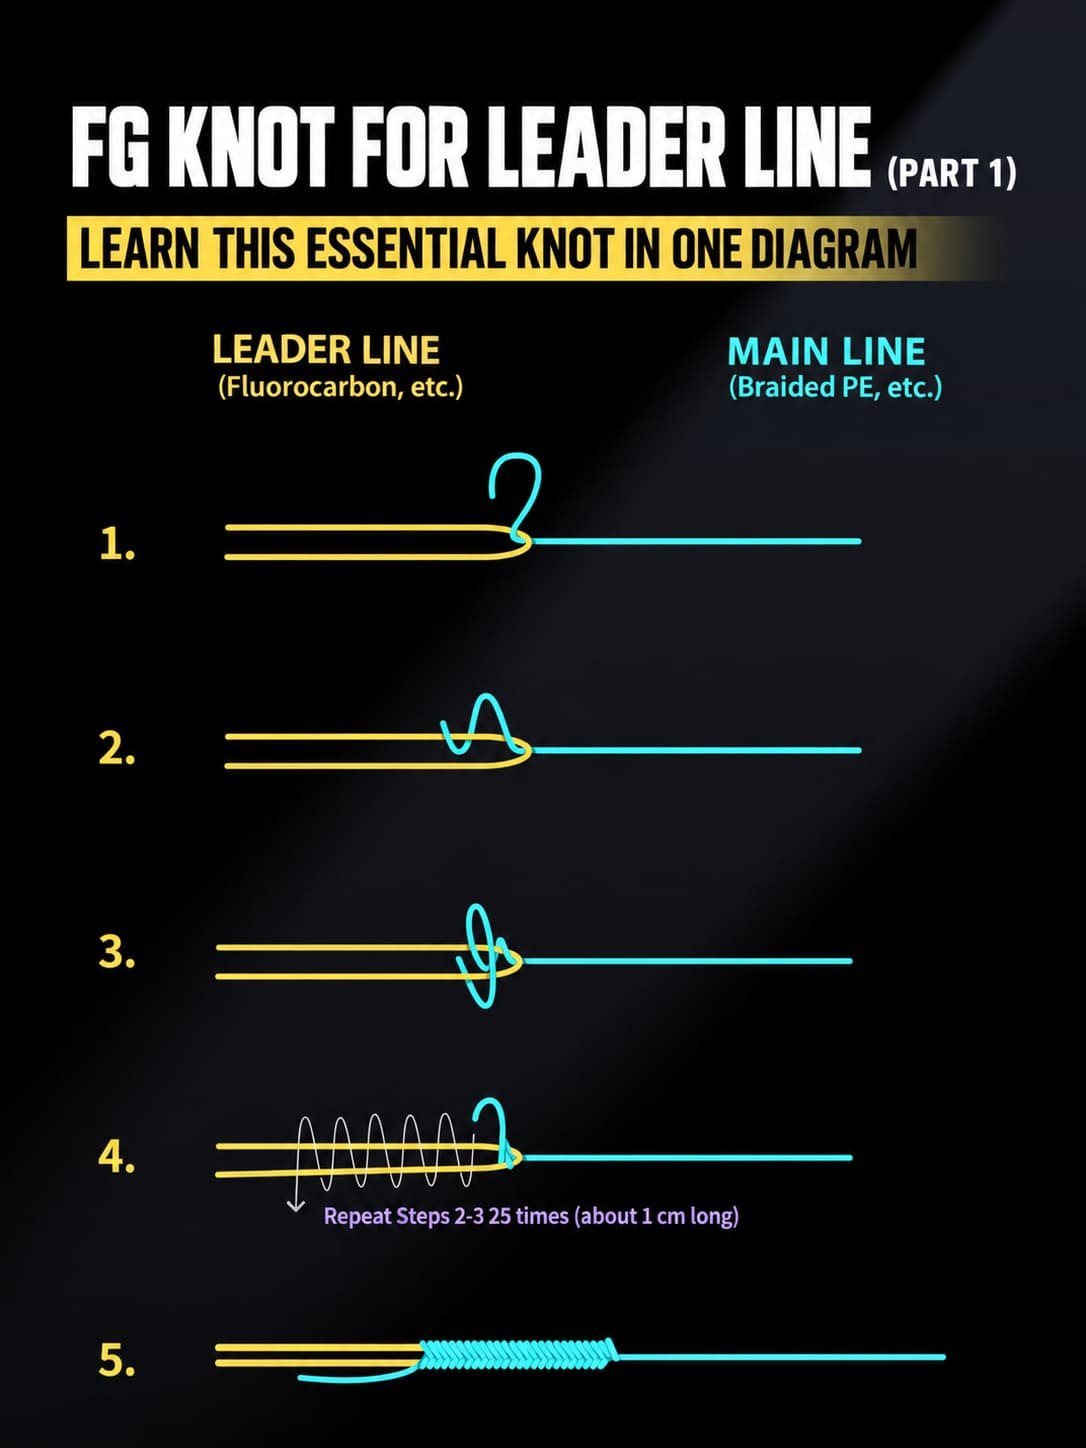
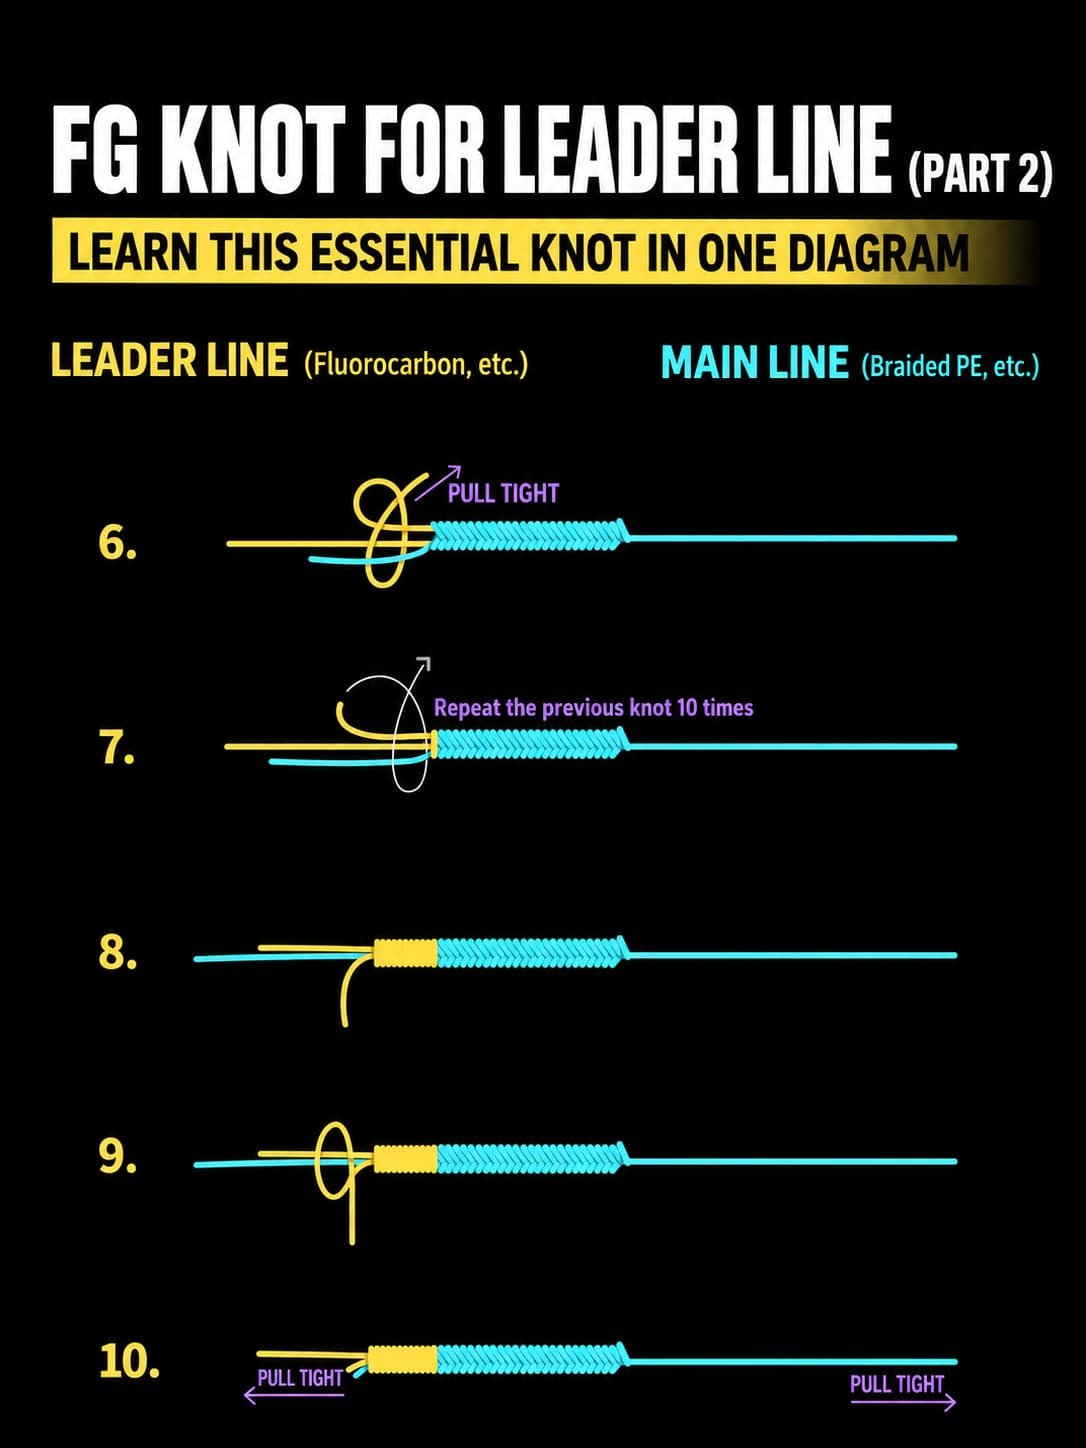
The FG knot joins braided main line to a leader by making the braid grip a single strand of leader. The connection depends on correctly arranged braid wraps, firm tension, and a secure braid finish. The supplied FG drawings need correction before beginners can use the illustrations as a reliable tying tutorial.
The captions specify repeating steps 2–3 25 times, building a wrapped section of about 1 cm, and repeating a finishing movement 10 times. However, the drawings show a doubled leader and leader-colored finishing wraps. A standard FG uses braid to grip the leader and form the finishing hitches. The printed counts do not validate the illustrated construction; the line paths need correction before they can guide the tying sequence.
Which knots attach a hook or lure to your line?
The improved clinch, Palomar, and Uni knots tighten against a hook or lure eye, while the non-slip loop knot leaves a fixed loop ahead of the lure. Choose the connection by how you want the line to meet the tackle. Learn the snug connections and the open-loop connection as separate tying patterns.
The eye is the opening where the line attaches to a hook, jig head, or lure. A snug knot seats directly against that opening. A non-slip loop keeps the knot away from the lure eye and leaves the lure room to pivot within the loop.
How do you tie the improved clinch knot?
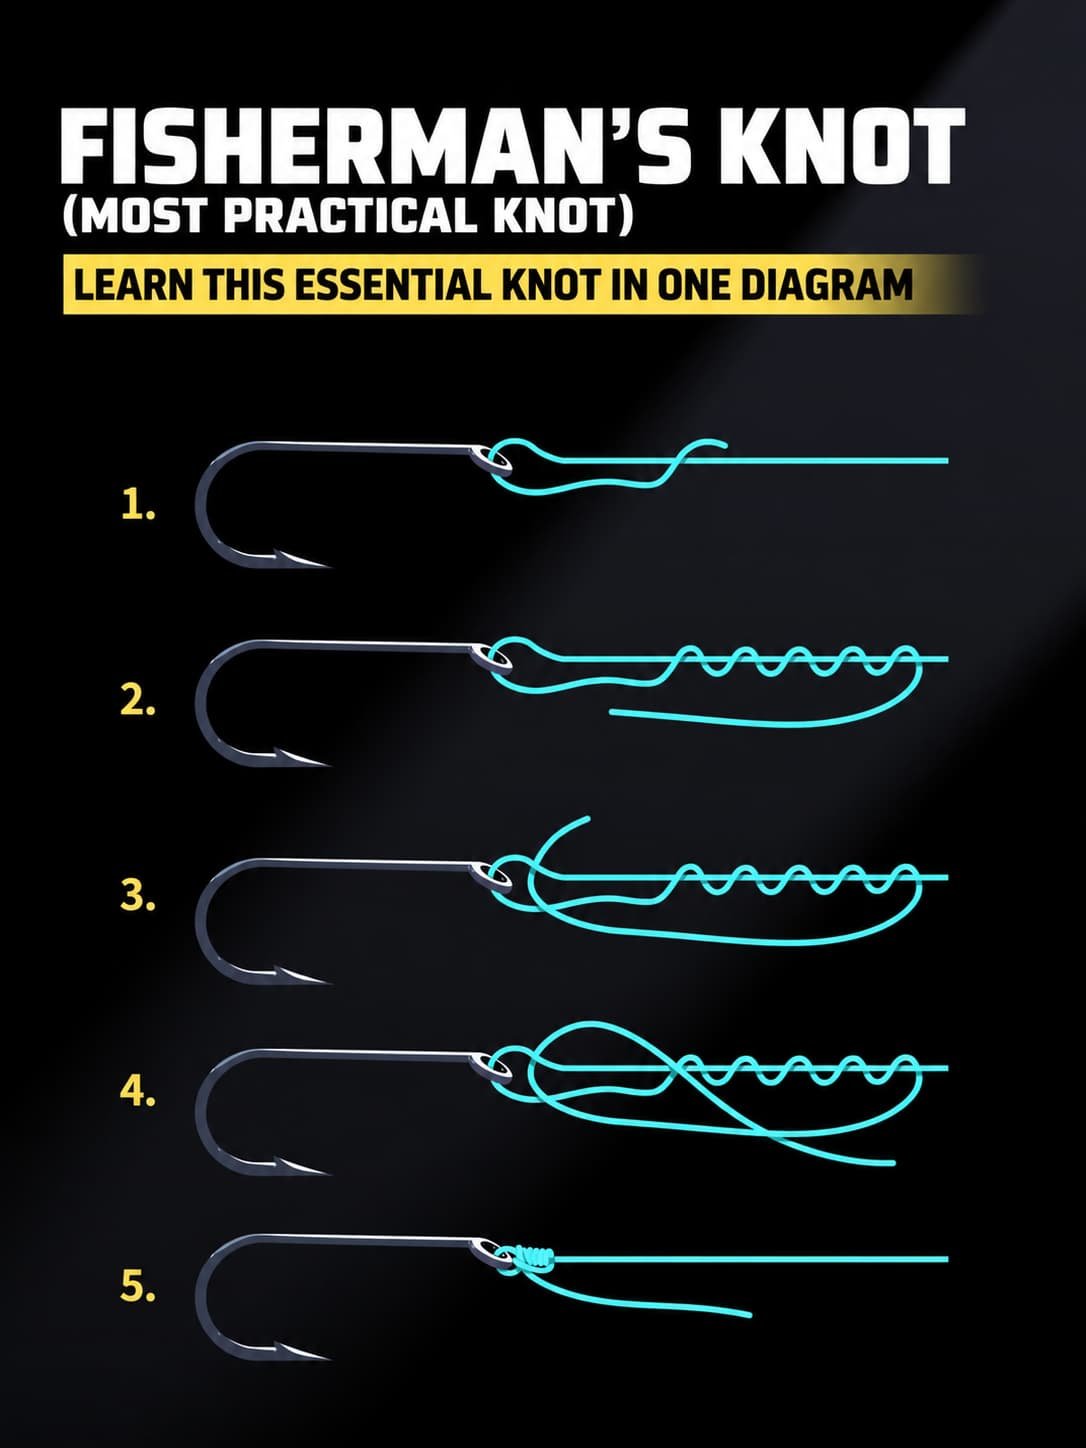
The improved clinch knot secures line to a hook or lure eye with a series of wraps and a final locking pass. The image labels the connection “Fisherman’s Knot,” but the illustrated sequence is an improved clinch knot. The final pass through the larger loop distinguishes the improved version from the basic clinch.
- Pass the tag end through the hook or lure eye.
- Make several wraps with the tag end around the standing line, leaving a small opening beside the eye.
- Bring the tag end back through that small opening.
- Pass the tag end through the larger loop created by the previous movement.
- Moisten the line and draw the wraps together gradually.
- Pull the standing line to seat the knot against the eye, then trim the excess tag end.
Watch the wraps as the knot closes. The coils should gather neatly rather than pile across one another. If the tag end misses the final loop, the finished connection does not match the improved clinch sequence shown here.
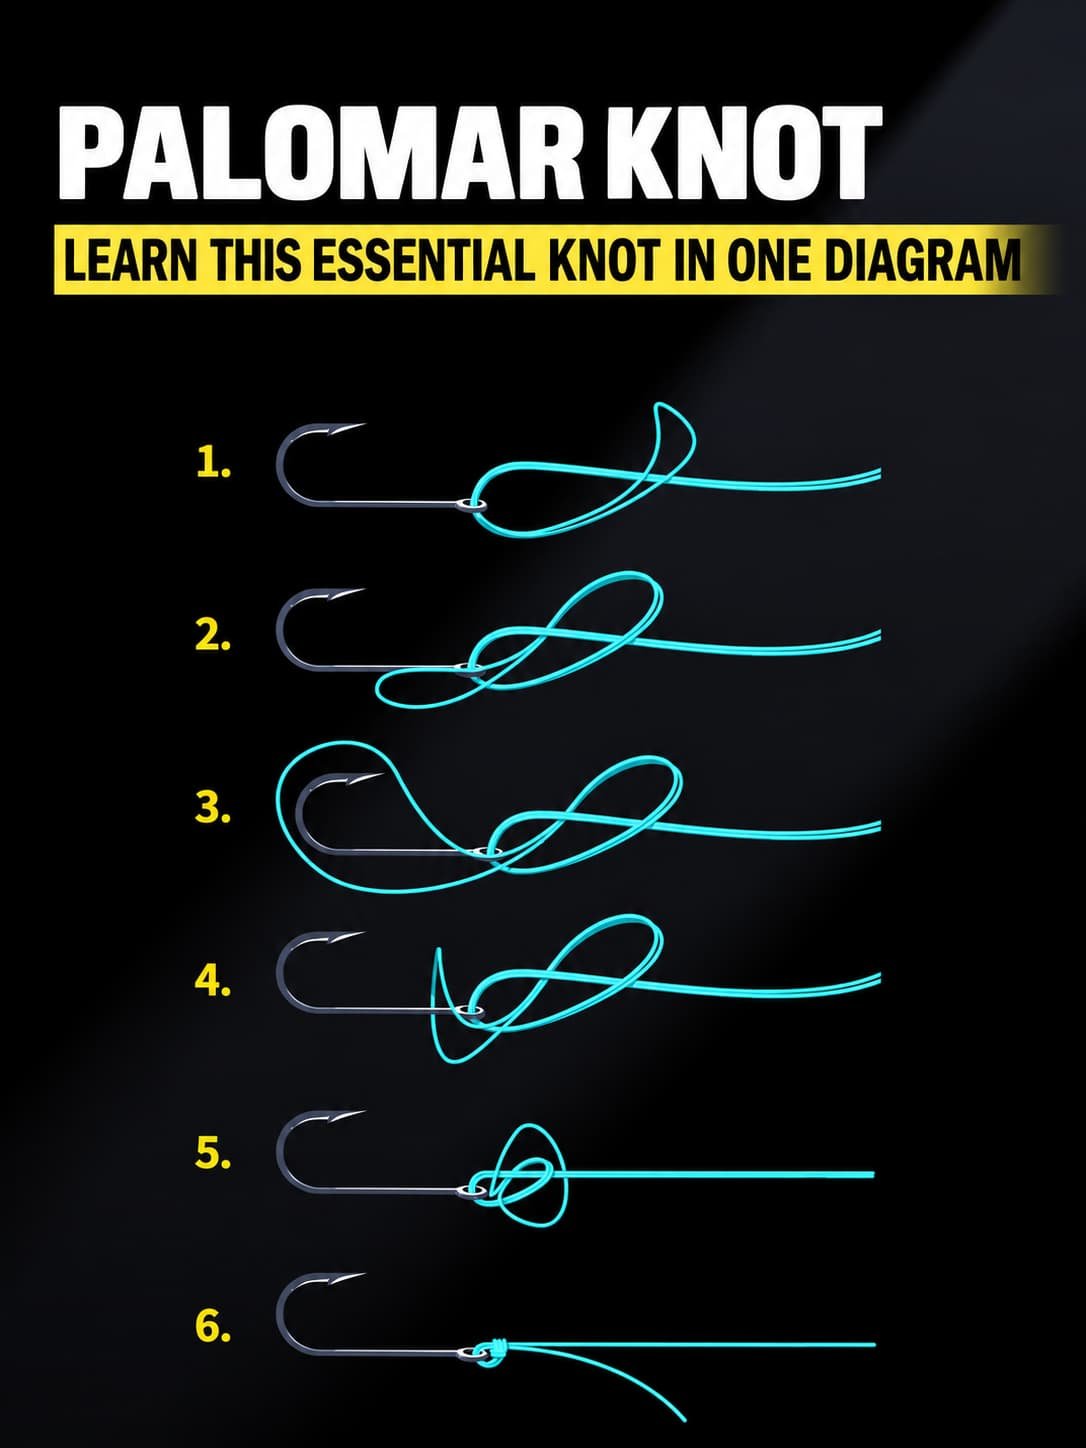
How do you tie the Palomar knot?
The Palomar knot attaches a doubled section of line to a hook or lure eye. Tie a loose overhand knot with the doubled line, pass the entire hook or lure through the remaining loop, and tighten carefully. Leave enough room in the loop to clear the tackle without disturbing the knot.
- Double the line and pass the folded end through the eye.
- Tie a loose overhand knot with the doubled line. Keep the hook or lure hanging below the knot.
- Open the remaining loop and pass the entire hook or lure through the opening.
- Bring the loop completely over the hook or lure and above the eye. Clear any trapped line.
- Moisten the knot and pull the standing line and tag end steadily to seat the connection.
- Inspect the seated knot before trimming the tag end.
The loop must clear the whole piece of tackle. A bare hook passes through easily; a larger hard lure needs more working room. Keep both strands together as you draw the knot down, and check that the loop has not caught around the hook or lure body.
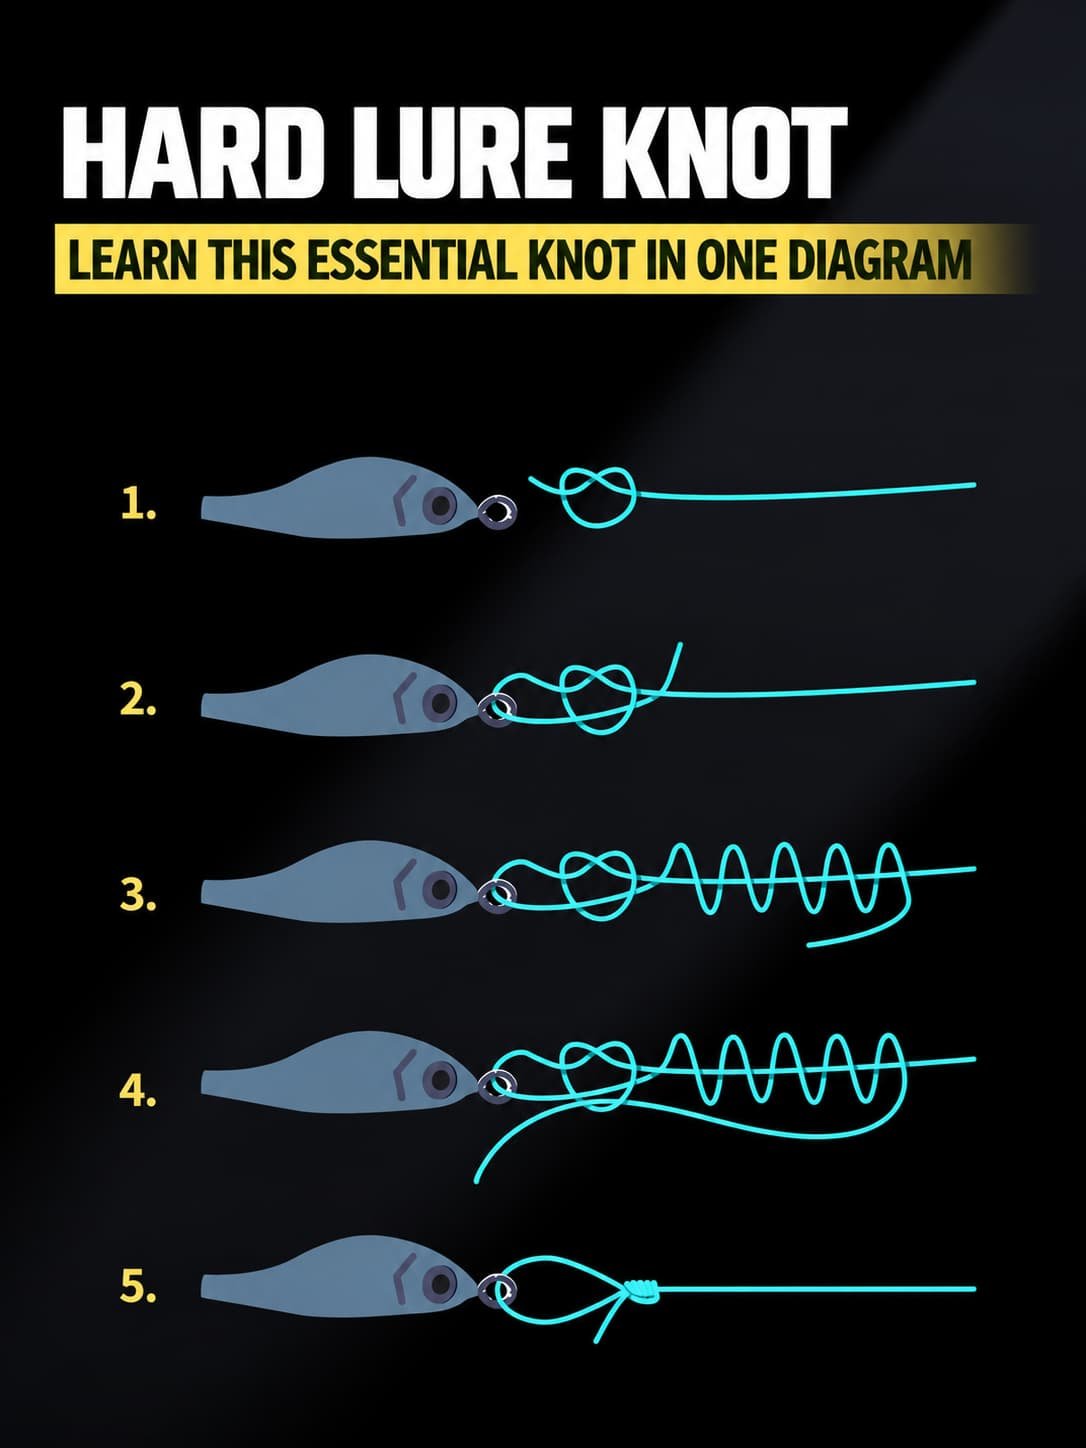
How do you tie a non-slip loop knot for a hard lure?
A non-slip loop knot connects a hard lure while leaving a fixed loop ahead of the lure eye. Start with a loose overhand knot, thread the lure onto the tag end, then complete the wraps and return through the overhand knot. Set the loop size before tightening the connection fully.
- Tie a loose overhand knot in the line.
- Pass the tag end through the lure eye.
- Bring the tag end back through the loose overhand knot.
- Make several wraps with the tag end around the standing line.
- Return the tag end through the overhand knot, entering from the same side where the tag end exited after the first pass.
- Moisten the knot, adjust the loop, and tighten steadily before trimming the tag end.
The finished connection should retain a loop between the knot and the lure. Pulling the knot directly against the eye removes the feature you were trying to create. Keep the loop controlled while seating the wraps so the final shape matches the intended connection.
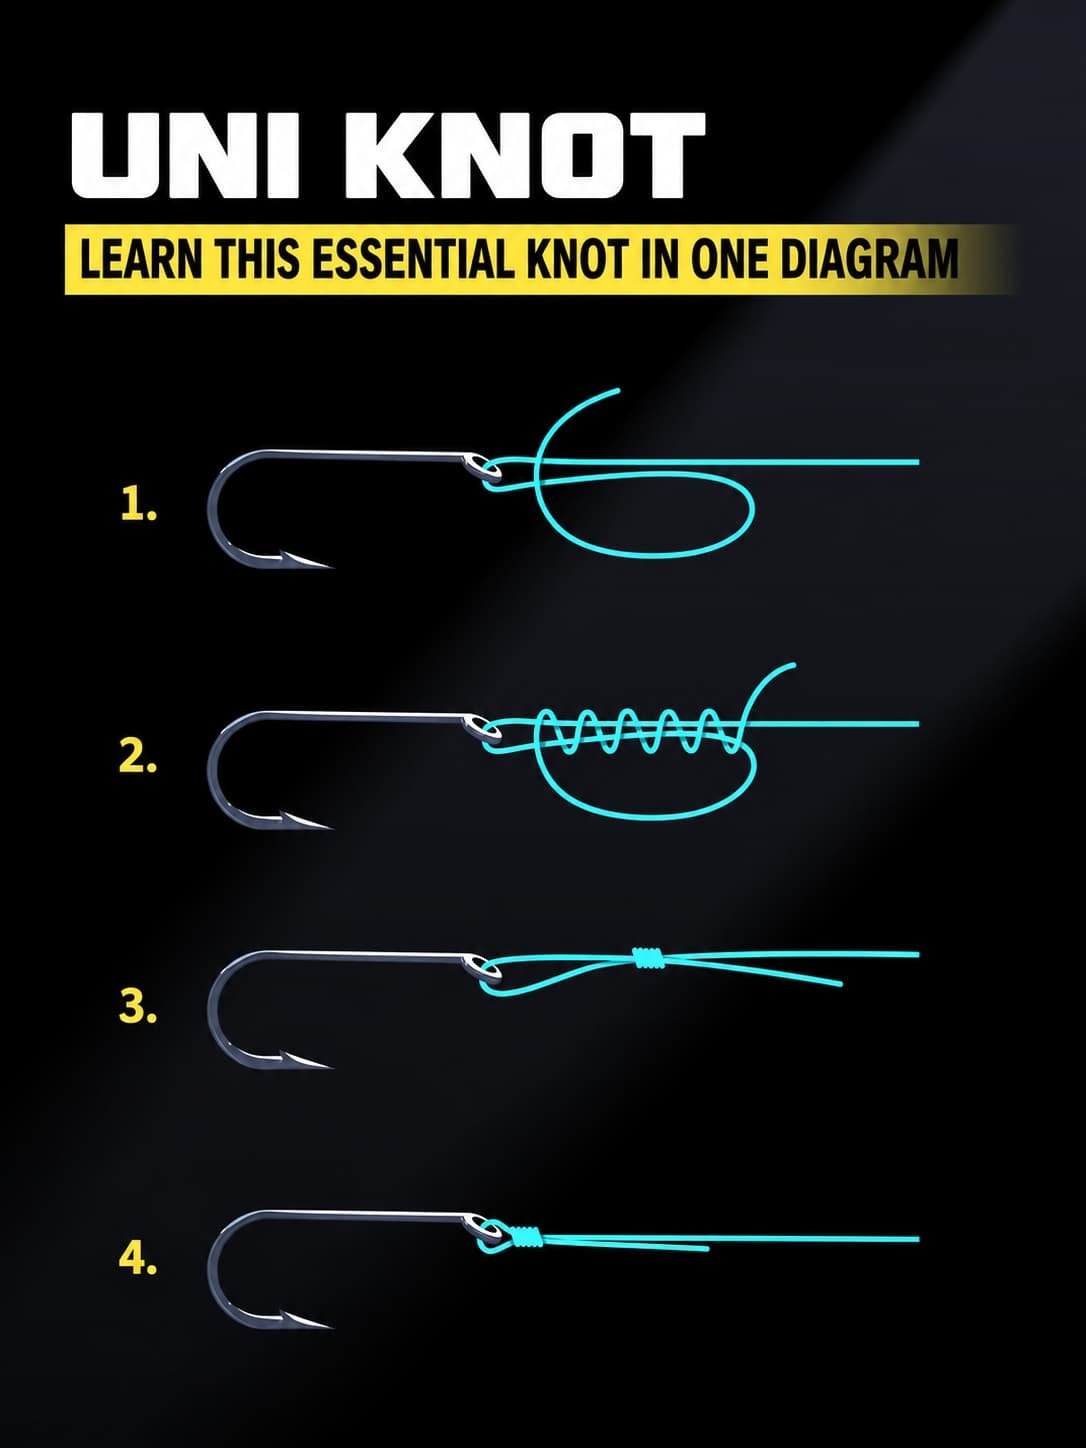
How do you tie the Uni knot?
The Uni knot attaches line to a hook or lure eye by wrapping the tag end around doubled line inside a working loop. Tighten the wraps first, then slide the compact knot down to the eye. The same basic wrapping movement also appears in the sliding spool connection described earlier.
- Pass the tag end through the eye and lay the tag end alongside the standing line.
- Bend the tag end back to form a working loop beside the doubled line.
- Make several wraps around both parallel strands, passing the tag end through the working loop with each turn.
- Moisten the line and pull the tag end to gather the wraps.
- Pull the standing line to slide the knot against the eye.
- Check the seated wraps and trim the excess tag end.
The working loop gives the Uni knot its recognizable tying pattern. Each wrap passes through that loop and around both strands. Tightening the wraps before sliding the knot helps you see whether the coils have gathered evenly.
Practice with the line and tackle you intend to fish. Tie each connection slowly, inspect the line path, and apply a firm, controlled pull before trimming. When the wraps cross or the knot slips, retie the connection while the problem is still easy to see.